Showing posts with label Techniques. Show all posts

Friday, January 27, 2012

Sprinkled Expressions

Hey there!


Have you gone nuts over Sale-a-bration yet?


This weekend I'm having my first workshop of the season and I can't to share and experiment with some of the stamps sets I was able to preorder as a demonstrator. I CASE'd (Copy and Share Everything) this card from a fellow demonstrator, Patrice Herrera at My Little Patch of Dirt. I saw the main design before she added that cute little shooting star or finished the inside. I love this layout so much that I made a set of these to show you. I'll be making a whole slew of these soon!

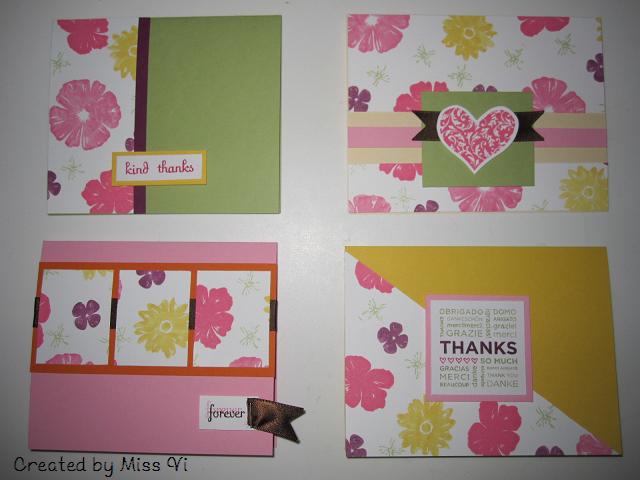
Each of these cards have Whisper White and Early Espresso for my neutrals, combined the 2011 In Colors, and I used the Square Lattice and Perfect Polka Dots embossing folders for a ribbon-like texture on some of my scraps. I used the SAB stamp set Sprinkled Expressions. It's right up my alley in terms of being a fun, bold, and graphic style!

Wisteria Wonder with Lucky Limeade.
How sweet!
 
Island Indigo with Calypso Coral.
What a great masculine card!

Lucky Limeade with Pool Party.
The color names make me think of summer in all this cold weather!

Pool Party with Island Indigo.
So refreshing!

Calypso Coral with Wisteria Wonder.
Almost a tropical feel to it!

In the past, the In Colors have been great but I always had one I loved so much more than the rest. First, it was Bermuda Bay, a feisty teal color. The 2010 In Colors not only brought a revamp on the product line by lasting two years, but they are staples when I want bright, bold, and basic colors. I loved them as a supplemental set to our regular color families. With the 2011 In Colors though... I just love using them as a set. They work so well together and are so fun and fresh!

Embossing the pieces of Early Espresso so they resembled ribbon was a fun touch. I even took my distressing tool from my Cutter Kit and roughed up the edges of one of the pieces. The main image of the card (the very back white piece) is popped up with Stampin' Dimensionals. Those little things mean business! The background of my card base was made by not only using my Versamark watermark ink pad, but adding on some Clear Stampin' Emboss Powder for that extra oomph! It feels so slick and shines at the right angle. These extra step really took the card to the next level and I'm always looking for ways to do that!

Here are some close-up in progress pictures of heating up the embossing powder. It always look like I'm performing some sort of crafting magic trick when the powder melts!


It's so awesome. Just when you start to doubt whether you'll notice the difference, it blows your mind. Maybe we're just easily amused, ha ha!


Sunday, January 15, 2012

Herringbone Holidays

Hello there!

The holidays may be over but we still have plenty of leftovers to deal with in the aftermath. Oooh, especially those treats. Evil, evil treats.

I also had plenty of Holly Berry DSP from the Holiday Mini Catalog, so I decided to use it in an experiment with the Herringbone technique. Here's the result:
I used two pieces from my Fabulous Phrases to make the sentiment thinking that it could be a thank you note for a gift from the holidays. The strips are 1/4 of an inch wide.

Here's what I learned: this paper was so overwhelming. I tried to tone it down by grabbing my Chocolate Chip Stampin' Write Marker and using the brush tip end to draw in lines that broke up the sections more. Next time, the patterns need to be much more subtle. I could have gotten away with a wider size for my sanity too. My 1 1/4 inch and 1 3/8 inch Square Punches were perfect and easy for the sentiment.

I also added a little touch inside:
I cut out one of the bunches of holly berries from a scrap pieces because I thought they were darling! That's just tucked into a corner on the inside of the card and outlined for a little touch of whimsy.

Hope that you all have recovered nicely!

Thursday, September 15, 2011

Adorable Storage

Hello all!


I wanted to show you what I'm now using as storage for all of my Simply Adorned inserts that I've been making. It makes for a great and simple gift!

All thanks to Laura Denison of Following the Paper Trail: Her Gift Card Wallet design! She doesn't want us to embed her videos so you have to click on the link to watch the quick YouTube tutorial. She is so creative and lovely.  I may have cheated a little bit with my Very Vanilla lettering. While I used Stampin' Up! cards stock, I grabbed by beloved Cricut's Lyrical Letters and the images were inspired by Cricut's Simply Charmed.
These are themes from different classroom lesson plans. 
That is the gorgeous Pacific Point blue.
  I think I'm going to have much more of these in the future!
The pockets are the retired Bermuda Bay. It was my favorite.
 This one holds the generic everyday inserts.
This booklet is in Night of Navy. It was the base of my Christmas cards last year!
 I will probably add more monochromatic and personal themed inserts in the near future.
The pockets are in Very Vanilla.
 This sweet one features any holiday or seasonal inserts.
Again, this is in Bermuda Bay.
 There's not many now, but you know I have a bunch planned. 
I've only made it a third of the way through my preliminary idea list!
These pockets are also in Very Vanilla.
 
How sweet is that? It saves me from throwing them in a box and flipping through them like a deck of cards. I comfortably fit four per row, meaning that I can keep 24 inserts per booklet (or 12 coordinating pairs). The pockets are 1 inch deep and the entire thing is 5 x 5 inches when closed. 
After my first time making one, I realized I wanted to make sure I had enough give for a small spine and somehow the second one came out all crooked (it had a spine though!).
They peek out in the picture, but keep in mind that these tiny pieces are only 1 1/4 inches tall! They fit all snug and I can recognize what they are just by seeing a little bit of the top and slide them out with my thumb. 
Please let me know if you have any questions!

Saturday, May 7, 2011

National Scrapbooking Day

Hey there!

Not only is May National Scrapbooking Month, but today marks it being National Scrapbooking Day! I've started to celebrate by indulging in one of my latest obsessions of creating a mini-album. My only problem so far is that I keep making so much, that I've started to give them away as gifts left and right because I don't have enough pictures of my own to fill them! A little tragic as a crafter, I know.

The project I wanted to learn and play with was creating an Exploding Box mini album. There are several tutorials about creating the pure plus-shaped or twirled outer layer boxes, but I decided to go with one that had the outermost layer wrap around the bulk of my box. Click on my brief description of the popular variations I just mentioned to see a good tutorial with pictures of each! However, feel free to search on your own (even for videos and entire galleries dedicated to this technique) and let me know how I can help!

I focused on making this a fun summer-y box to motivate myself to take more pictures in the coming months! Luckily, it was really easy grabbing DSP and card stock from the Brights Collection and using my Fabulous Florets (W123025, C123027, Summer 2011) stamp set from the new Summer Mini.

Here are the snapshots: (I may have gotten a little excited about using my cheapo corner-rounding punch!)

 The top of the lid. 
I kept the middle somewhat sparse because I'm planning to add more decor in the future.
My Exploding Box: All wrapped up and tight.
Unleashing the beast and showing how I decorated all around the edge.
A peek down into the center.
Its three layers begin to unfurl!
I did add layers to both sides of the layers- just in case!
View of both sides of the middle layer.
The outermost layer.
The whole she-bang opened. 

I just love the festive tropical color scheme. I cannot wait to figure out what pictures and journaling will be added to this project. Then I can really let loose and add more embellishments! Paper icing on the already delicious-looking cake. 

I hope that you try to catch up on a few pages of scrapbooking (I realize that most of us are probably a few years behind) or try something new such as making a much less intimidating mini album some time during this month. Plus, trying it out now is a great thing with all of the discounts you can find!

I'm going to go play with the Exploding box a little more,
so
- - - - -
The Recipe:
 - Stamping -
Fabulous Florets 
(W123025, C123027, Summer 2011)
- Paper -
Brights Patterns Designer Series Paper Stack (117155),
  Daffodil Delight (119683),
Melon Mambo (105130),
Old Olive (100702),
Pumpkin Pie (105117),
Rich Razzleberry (115316), &
Tangerine Tango (111349)
- Stampin’ Write Markers -
Brights Stampin’ Write Marker Assortment (119702)
- Adhesive -
  SNAIL Adhesive (104332) &
Sticky Strip (104294)
- Extra -
  Bone Folder (102300)

Tuesday, April 26, 2011

April Showers

Hello!

Personally, I love running around in rain showers. It feels so refreshing to not only me but to the atmosphere. However, I'm sure some of you out there are getting tried of being shut-in because of the dreary storms and it will be especially good that April showers bring May flowers. Either way, April is wrapping up and so are a few of our promotions! (The links from the captions and pictures will work until the promotions are over.)

Our Occasions Mini!

Yes, it's true! It's that time of year already when we have to say goodbye to all of the sweet seasonal products. There are a few select items that are being carried over! Feel free to contact me to find out if your favorites made the cut. 

The Spring is Blossoming preview of the 2011-2012 Idea Book & Catalog!

Time is running out to qualify and purchase the "Four Frames" set and "Paisley Petals" DSP. They are both a hint at what's to come in the once the 2011-2012 Idea Book & Catalog drop this summer. Such intricate designs, it's all very exciting. 

Grab your grab bag!

These handy surprises are still available for $5, $10, and $15- I've said it before, but what a steal!

Alright, now that I've let you know what you need mull over during this last week of April, I wanted to help whet your appetite a little more! Kind of mean, I know. I went and grabbed myself the clear stamp set, Valentine Defined (123057) because it's not just for Valentine's Day in February. It can be used when making something for any loved one. 

Here's a nice enough card with the lovable tree 
colored in with Stampin' Write markers, 
but it's what is on the inside that counts, right?
Well, how about a gift card popping up to say, 
"Hello! Spend me!"
Or two tickets to that thing you like?
(I adore Isaiah Mustafa from the Old Spice commercials!)
Side view/ behind the scenes look. 

This was incredibly easy to make and I found the tutorial online from Paper Garden Projects, who modified an idea from the PaperCrafts Connection Blog. Pop-up cards are always great and they are making quite the comeback lately, so why not join in? Plus, there's a certain (national) teacher appreciation week coming up next week... *hint hint*. 

While we're still recovering from celebrating Easter weekend together, I hope to see you soon with a project I made with something from the new Summer Mini. Thanks again for tuning in!
- - - - -
The Recipe:
- Stamping -
  Valentine Defined 
(W121941, C123057, Occasions 2011)  
- Paper -
Real Red from
Brights Patterns Designer Series Paper Stack (117155)
Early Espresso (119686),
Very Vanilla (101650), &
Real Red (102482)
- Ink -
Whisper White Craft Stampin’ Pad (101731)
- Stampin’ Write Markers -
Real Red & Old Olive from
  Brights Stampin’ Write Marker Assortment (119702)
Chocolate Chip Stampin’ Write Marker (100071)
 - Adhesive -
SNAIL Adhesive (104332)
Sticky Strip (104294)
- Extra -
Cutter Kit (106958)

Sunday, March 20, 2011

One Spring Wonder

Welcome to the first day of spring!

I am still in complete awe with how much free stuff you can earn during Stampin' Up!'s Sale-a-bration! The workshop was a great success and I'm booked for one more before this joyous occasion ends on March 31st. I am having a total blast sharing all of these great products and ideas! I'm sure you can tell that by all of my exclamation marks. It's pretty hard to control myself!

I've been getting goodies every few days but haven't had a chance to really sit down and play with them yet. However, I do have something to share with you! This was an example of the One Sheet Wonder card  decorating technique and I found pretty decent instructions on Splitcoast Stampers (which also has it's own Stampin' Up! section). This is quite the doozy image wise, so hang on!

 Stamp one sheet of 8.5x11 inch paper!


How is that? Take one sheet of cardstock, create my own patterned paper out of it, creatively cut it up, and use it design ten cards? What a sweet deal! 

I didn't follow the templates perfectly but that's the whole point of making something handmade and personally. It resulted in a coordinating and fun collection of cards, some of which my hostess picked out as my thank you for opening up her home for the workshop.

Another great point of sharing this project to you is that you do not need a ton of supplies to make many nice gifts. This is especially so when you're first starting out. It's just like a wardrobe, with a few versatile core pieces, the possibilities are great!
 - - - - -

The Recipe:
- Stamp -
Curly Cute (W117014, C120510),
Fabulous Phrases (W117002, C120501) ,
Greenhouse Garden Two-Step Stampin' set (113824),
I {Heart} Hearts (W117010, C118571), &
So Many Thanks (120173) 
- Paper -
Certainly Celery (105125), Chocolate Chip (102128),  
Daffodil Delight (119683), Marina Mist (119682),  
Old Olive (119934), Pretty in Pink (100459),
Pumpkin Pie (105117), Rich Razzleberry (115316),
Very Vanilla (101650), & Whisper White (100730)
- Ink -
Certainly Celery Stampin' Write Marker (105106),
Chocolate Chip Classic Stamp Pad (100908),
Daffodil Delight Stampin' Write Marker (119677)
Regal Rose Classic Stamp Pad (105211),
Regal Rose Stampin' Write Marker (105108), &
Rich Razzleberry Stampin' Write Marker  (120970)
- Ribbon -
Early Expresso 5/8" Satin Ribbon (119753)
- Punches -
1-1/4" Square Large (119865)
1-3/8" Square Extra-Large (119850)
- Adhesive -
SNAIL Adhesive (104332) &
Stampin' Dimensionals (104430)
- Extra -
Ordinary Staple
Spare Button